
Return & Exchange Portal overview
Starting an exchange or return has never been easier for shoppers. The Happy Returns Return & Exchange Portal empowers shoppers to easily start their returns online in a matter of minutes, without having to contact your store.
If you’re interested in enabling languages other than US English in your portal, check out the language localization feature for the Return & Exchange Portal.
Shopper experience
To start a return or exchange in your Return & Exchange Portal, shoppers simply:
- Navigate to your store’s return portal. After onboarding, your return portal URL will follow the format: https://{your-retailer-ID}.happyreturns.com
- Search for their order information using either their order details (order number and zip code), email, or gift return information, depending on your return flow default login method configuration.

Search for the order via order number and zip code
- Select the item(s) for return or exchange After starting the return, a list of the shopper’s order history will appear, with the order they used to login, or the most recent order if they logged in via email, displayed at the top of the list. One at a time, the shopper will select items for return.
Items unavailable for return or exchange because of your shop’s return policies will appear greyed out and will not be selectable for return. These items will have a label at the bottom right explaining why they are unavailable for return (for example, Final Sale or Past Return Window).
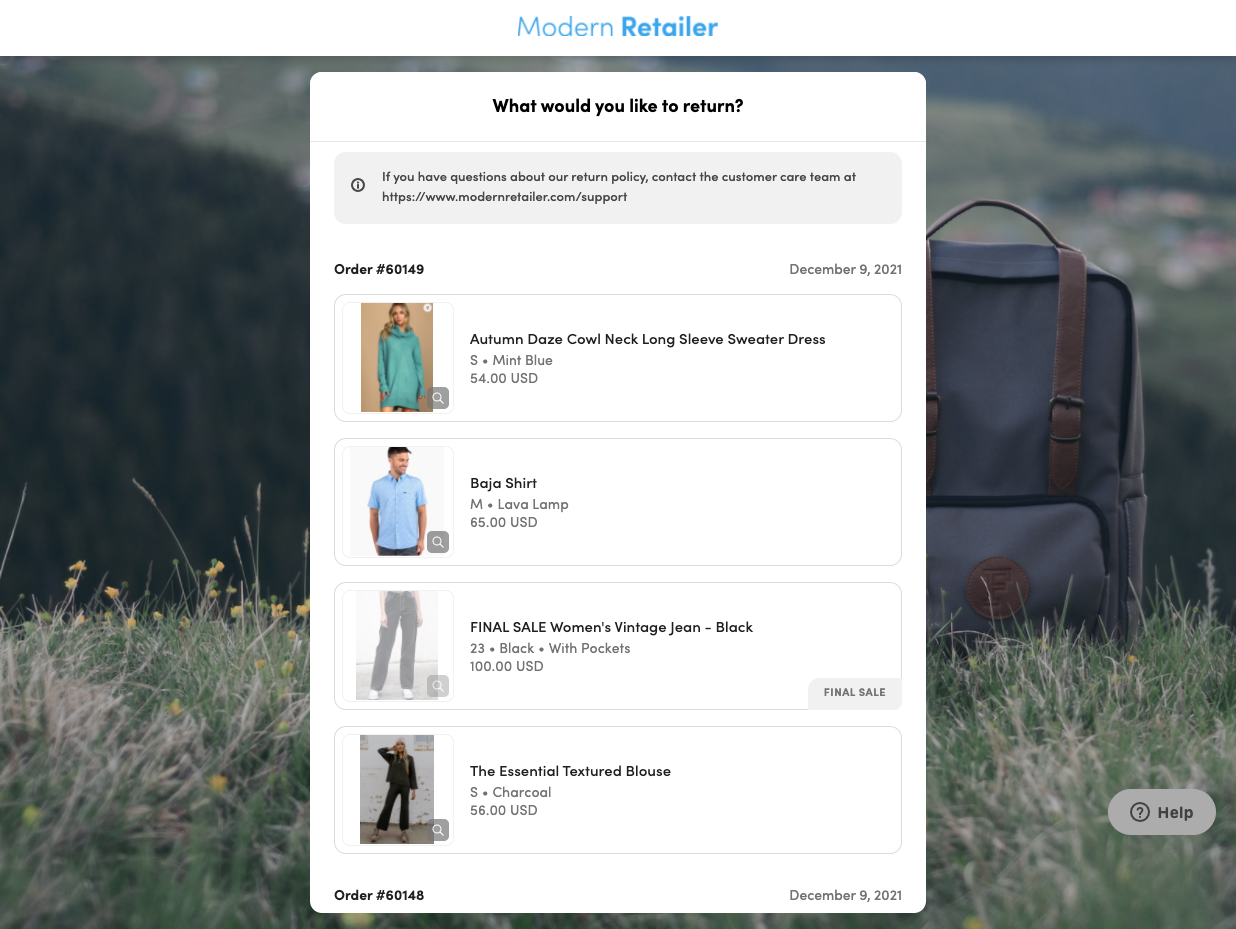
List of all items available for return
- Select the reason for return. Select the reason for return. After selecting an item for return, the shopper will be prompted to select a return reason for a list of your pre-defined return reasons.
- If you have reason notes enabled, after selecting a return reason the shopper will also be prompted to enter additional details on why they are returning the item. Contact Happy Returns to enable/disable return reason notes.

Select a return reason
- Select a return option. Next, shoppers will be prompted to decide how they’d like to complete their return.
- Depending on your return policy, shoppers may choose from the following:
- Exchange for a different product variant (size, color, style)
- Refund to the original form of payment (this may take 3 to 5 business days after return completion)
- Gift card / store credit to your store, available immediately after return completion
- If your return reasons are configured for one-click exchanges and the shopper selected a one-click exchange enabled option (eg. “Too Big”), then the one-click exchange result will appear before other return options (for example, offering to send the next larger size if “Too Big” was selected).

Select a return option
- The shopper should repeat steps 3 to 5 for each of the items they’d like to return. The shopper may select items from more than one order to include in their return. Once the shopper has finished selecting the items they’d like to return, they click Next Step.

Select all items for return, then click Next Step
- Select a return method. The shopper will be prompted to select how they will drop-off/send their items back to your warehouse.
- Depending on your return method, the shopper may choose from the following return methods:
- Return Bar: Shoppers make contactless, box- and label- free returns at one of our Return Bar locations.
- Return to store: Shoppers bring their items in-person to your brick and mortar store.
- Return by mail using a pre-paid label: Shoppers receive a pre-paid shipping label and return their items by mail using your chosen shipping carrier(s).
- When enabled for specific merchant and shipping zone, then the shopper will be presented with a list of all available (based on their origin country) pre-paid label carrier options, that they can select from. All carrier options including printed label and/or QR code would be presented when applicable.
- Return by mail using a shopper-purchased label: Shoppers buy their own shipping labels to return their items.
- If your shop has enabled the Promote Sustainability option in the return flow customization, then we will always show the most sustainable options first (Return Bar and/or return to store) and the shopper must click Show other options to see other available return methods (return by mail).
- Note, this selection does not impact returnless items.

Sustainable return methods display first if Promote Sustainability is enabled
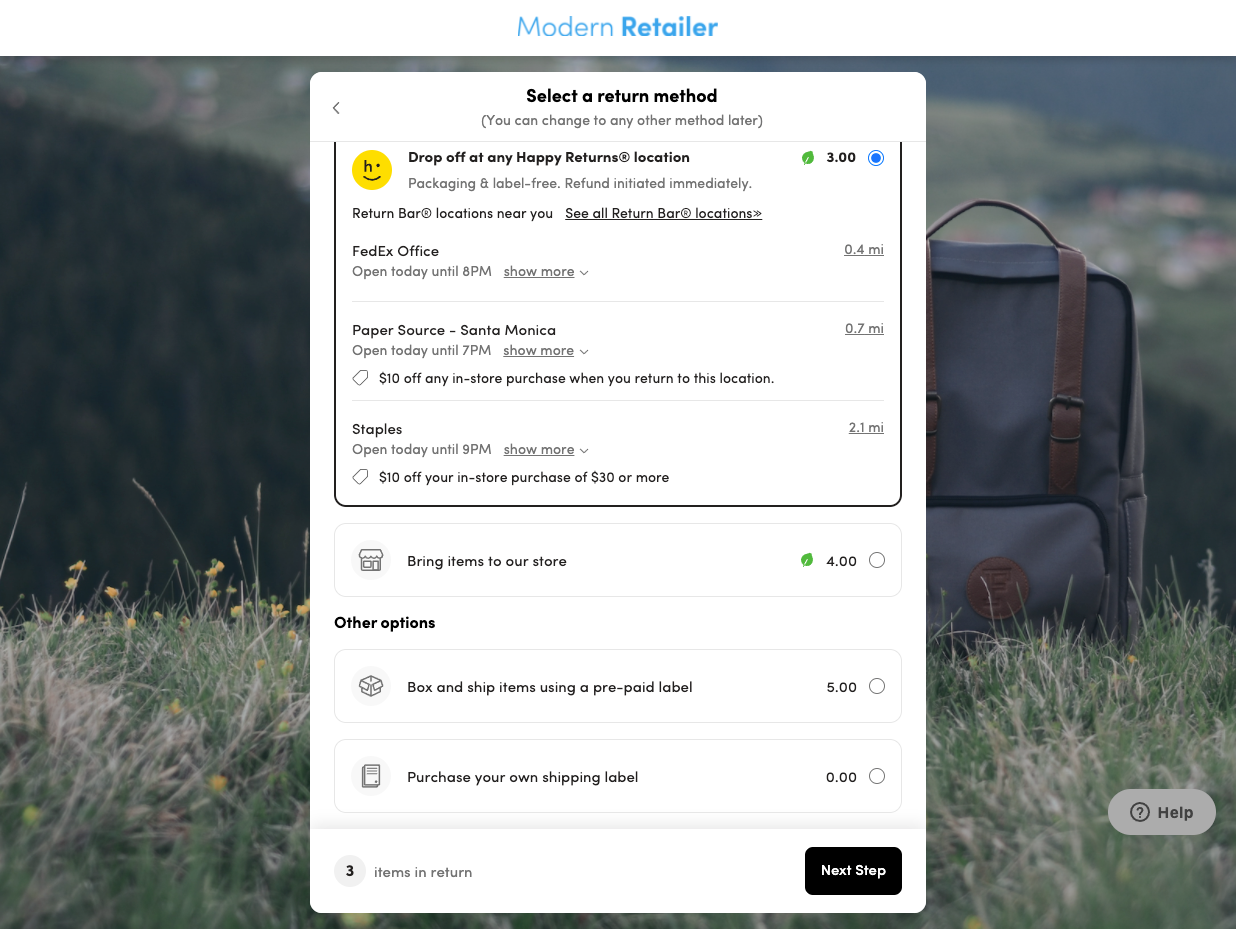
Clicking Show other options will show all return methods
- Review the return or exchange summary. After verifying everything is correct, the shopper clicks Submit to submit their return.
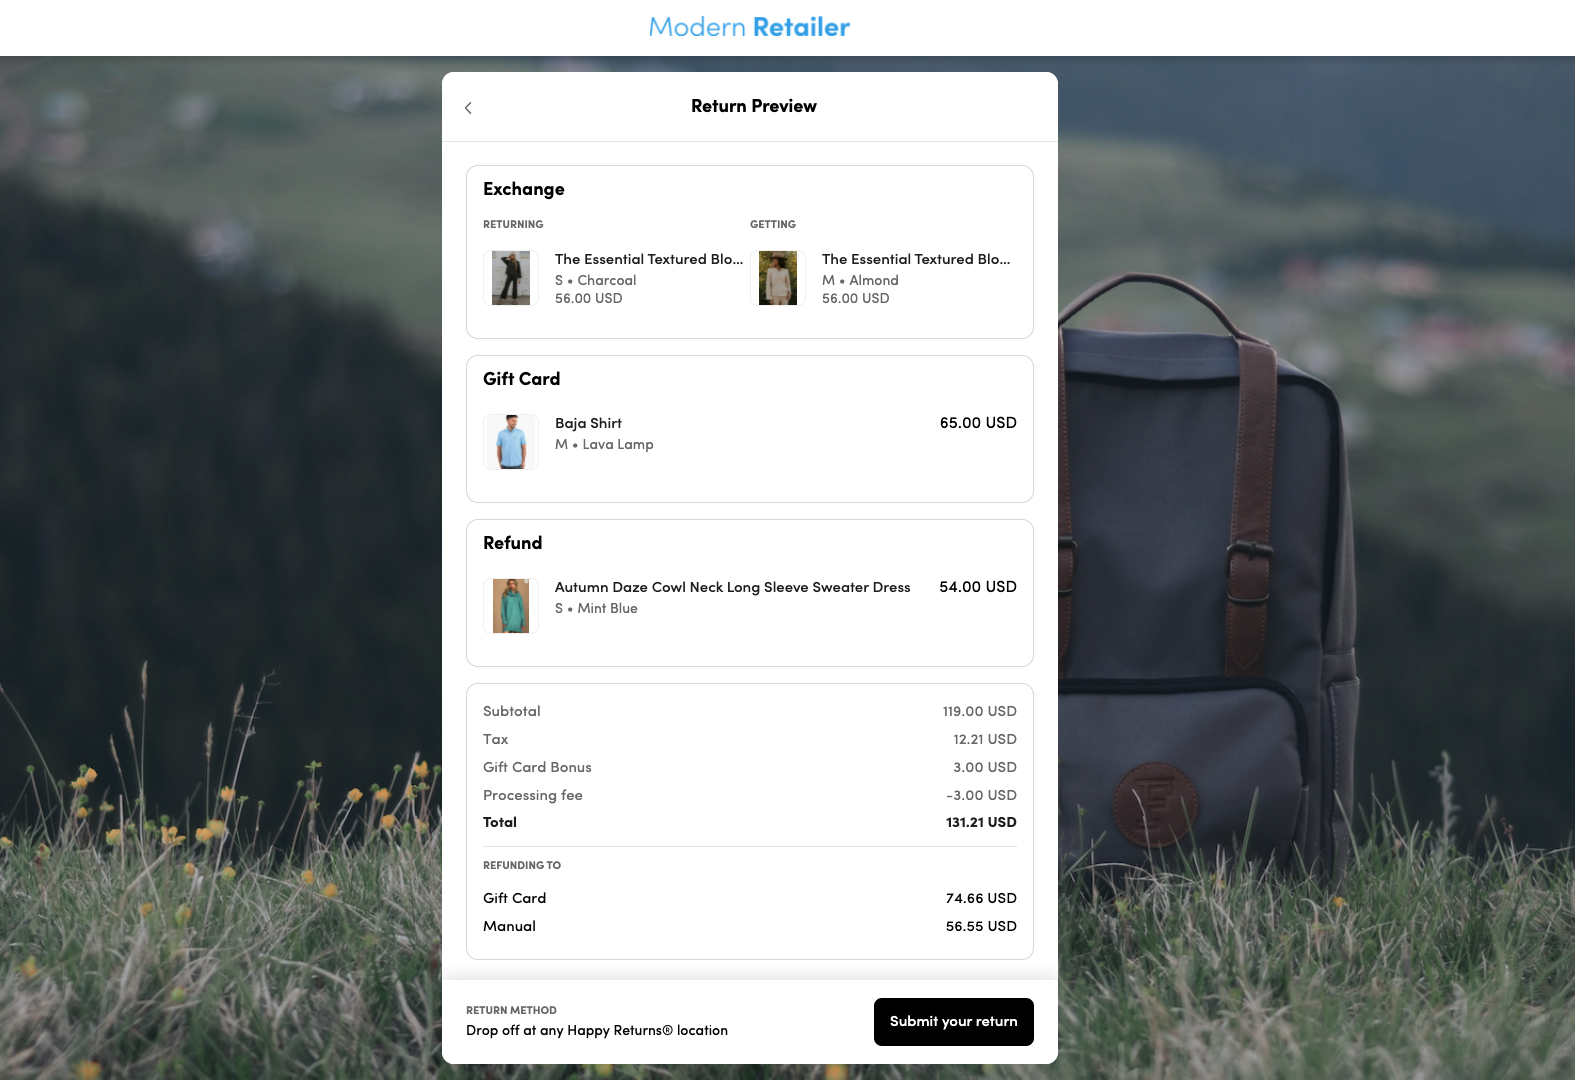
The shopper will see a preview of their return details prior to submitting their return
- After submitting their return, the shopper will be directed to a confirmation page which will include instructions on next steps, their return’s Express Code (a unique return identifier), and a link allowing shoppers to change their return method. Shoppers will also receive an email with this information.
- If the shopper selected to drop off their items at a Return Bar, then the QR code required to complete their Return Bar return will also be displayed.
- If the shopper selected the pre-paid shipping label as their return method, a button to download their shipping label will be available.

Confirmation screen of a Return Bar return

Confirmation screen of a pre-paid label mail return
Set up your return flow
To edit what shoppers see in each step of their return, you can update your return experience via the Settings page of your dashboard.
The following are the primary pages for updating your return flow (note: depending on your e-commerce platform, some settings may not be available for editing. Merchants using other platforms should contact Happy Returns support to make changes).
Return methods: Use the return methods page to set which return drop-off options are available to your shoppers.
Return reasons: All merchants can edit their admin return reasons on this page. Shopify merchants can use the return reasons page to also set the reasons shoppers can choose from when justifying their return.
Return policies: Shopify merchants can use the return policies page to set your return options (refund, exchange, gift card), the return window for each return option, and the trigger for when returns are approved.
Customize your return portal
Customize the look and feel of your return portal to match your brand using the Customize page on your dashboard. Use the following tabs to make changes to your Return & Exchange Portal:
Global Branding: Use the Global Branding tab to update your portal logo, links, favicon, and button colors.
Return Flow: Use the Return Flow tab to set your portal background images, default login view, and shopper messaging.
FAQs
In the case an exception needs to be made, we recommend starting the return as an admin. Starting a return as an admin allows you to override return policies that limit your shoppers from starting returns, such as final sale, past the return window, and any other reason an item may be greyed out and non-returnable in the shopper-facing portal.
There are a few reasons why your shopper may be unable to start their return, we recommend verifying the following before contacting support:
- The order number and zip code must be valid and exist in the store associated with your Happy Returns account
- The zip code must be the original order shipping address zip code, not the billing address zip code (if distinct)
- An email address must be associated with the order
- The shopper must live in a country supported by your shipping zones
If all of the above is true, contact support for additional assistance.